
TECHNICAL NOTES


WRITTEN & PHOTOGRAPHED BY: STEVE HOLLOWAY
Images from posts throughout Toolbox with notes on how they were captured and how they were processed in post production.
Includes resources you can use to develop your post production skill set.
ON LOCATION
- Working with Light
- The Scout
- Shooting During the Golden Hour
- Photographing People
- Details, Shadows, Shapes and Textures
- Plate Shots and Reflections
- Feed Your Passions
- People and Food Two of My Favorite Subjects
- On The Road
- Wall Art
- Transitional Images
- Night Photography
POST PRODUCTION
- General Practices
- Assemblages & Abstractions
- Change the Composition of an Image
- Color Correction vs Color Grading
- Color Correction & Color Grading Samples
- Create Motion with Live Photo
- Resize Images and Retain Detail
- Software and Skill Building Resources
- On Board Apps
- Offboard Software
- Post Production Apps
- Online Resources

General location practices plus a step by step deep dive into how the portrait, food, architectural, night, car, landscape, shape, pattern, abstract and assemblage images were created.

I rely on the ability iPhone has to utilize the natural light in almost any scene. For portraits especially, I look for open shade areas. I also look for ways to use window light. Window light is almost always soft, directional and warm. It’s especially good for still lifes, portraits and food photography.

Travel photography is usually shooting what you see when you see it.
Sometimes, when we stay in one city or town for several days, there is usually a location I really want to capture. That I can return to several times, giving me the chance to scout it first. If possible, I visit the location at 2 or 3 different times of day. I look at the light and at camera angles, taking test shots of each.
Finally, I choose a time and plan how I’m going to capture the location. Does it always go as planned? No. That’s what makes shooting on location interesting. In Rockport, there was too much glare on the bay behind our hotel during the day and it was too cloudy every evening.
Every evening that is except the last evening when everything fell into place and I got the image below.


The last hour before sunset and the first hour after sunrise are the “golden hour”. Movies will shoot for an hour after sunrise and an hour before sunset for days to capture a golden hour scene.
Shoot during the golden hour’s even, soft, directional, warm light and it will be hard to overexpose or underexpose highlights or shadows. It’s almost always the perfect light to capture extraordinary images.
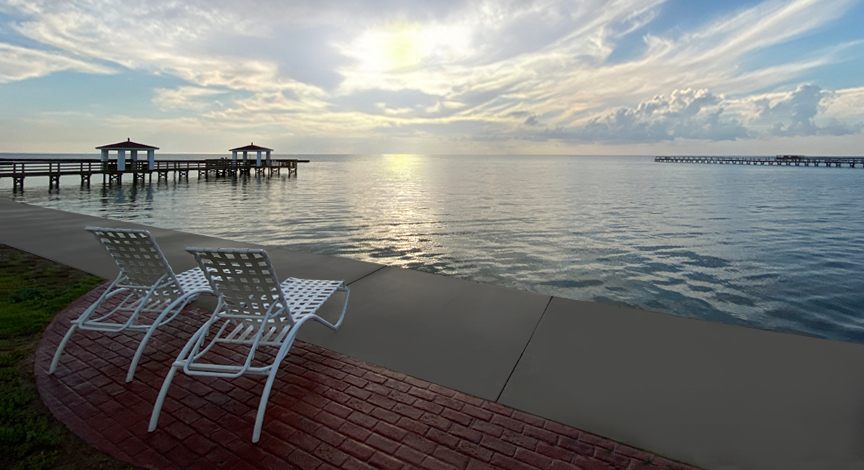
The Bay Behind The Lighthouse Inn. During our Back to the Coast road trip, I photographed Rockport Bay outside of our room at The Lighthouse Inn more than once and wasn’t happy with any of the shots.
Then, on our last night, shortly before sunset, during the golden-hour, I looked out the window of our room. The clouds had broken and the sunlight was skimming perfectly across the water. I hurried to get outside. I started with a view from our back patio then moved closer. I shot at the ground level point of view. Then eye level. Finally, I placed the camera at waist level and captured this image handheld on an iPhone 11 Pro Max with Beastgrip and Bluetooth shutter release.

Portraiture is One of My Favorite Disciplines. Pulling out a DSLR rig can be intimidating to some people. Shooting with an iPhone is just the opposite. People are used to selfies and smartphones making an iPhone unobtrusive. So much so that a photographer can blend in with what’s going on adding a level of spontaneity to capturing images.
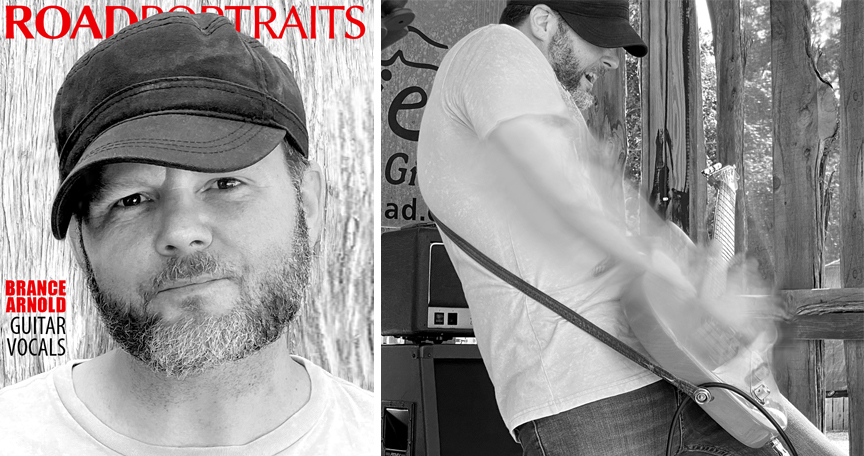
This portrait for the cover and live action photo of Brance Arnold for Road Portraits were captured using natural light on location. The cover image was photographed hand held in open shade. The on-stage live was photographed using natural light. Both images were captured on an iPhone 11 Pro Max with Beastgrip and Bluetooth release.
Post production included using the Long Exposure option in Live Photo to add motion to the on-stage image then offloading the images for background clean up, recombination and conversion to monochrome.

Look around any scene and you will find details that tell a bigger story. Details that become the subject.
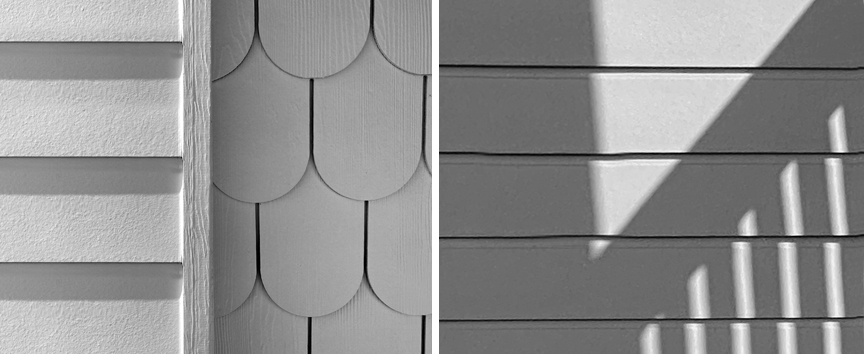
The siding of the Lighthouse Inn, Rockport Texas, photographed in mid-afternoon suggest the surroundings and warmth of a sunny day at the beach.
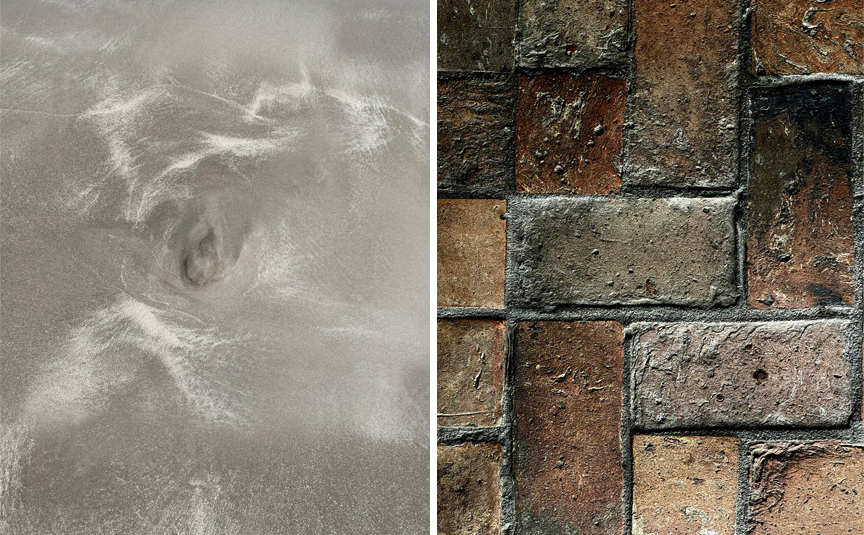
Sometimes the most interesting subjects are right under foot. The sand at Rockport Beach (left) formed this abstraction and the stone brick floor (right) in the Church in Goliad provided this textured, geometric pattern.
Photographed hand held with an iPhone 11 Pro Max with Beastgrip and Bluetooth release rig in natural light.

Plate Shots are background images you use to add elements to. This technique is borrowed from film making. It let’s you build the images you imagine that would, otherwise, be difficult to capture in one image.
Shooting reflections creates some of my favorite images. Look for glass or water in a scene that it reflecting a subject and choose your angle of view to control where the image is distorted.
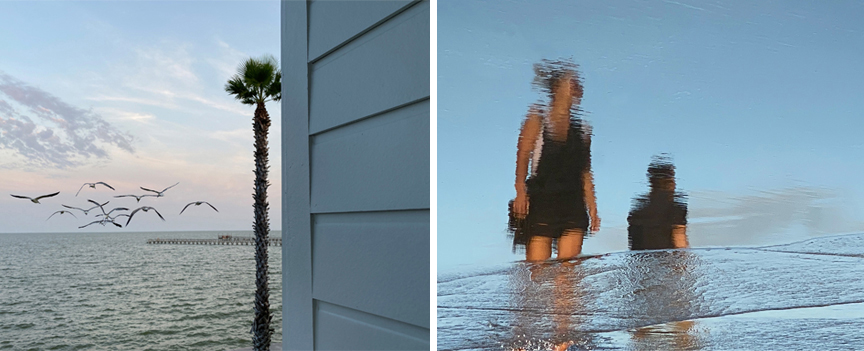
The bay scene outside of the Lighthouse Inn (above left) was captured to use as a Plate Shot. The gulls were photographed as part of a series of gulls images the evening before at Rockport Beach to use as elements in other images. I offloaded the images, cleaned up the sky and water, corrected the perspective of the wall and created a mask to take the gulls and place them near the horizon.
The beach reflection image (above right) was captured midafternoon at Rockport Beach. I spent 5-10 minutes looking down at the sand, watching the people walk by and the ocean water come in and recede. I started shooting when the elements came together capturing this reflection. The water ripples held enough detail that you can see it’s two people while turning them into abstractions at the same time.
Both images were captured on an iPhone 11 Pro Max with Beastgrip and Bluetooth shutter release.

One of my passions is vintage cars. If there’s a vintage car show within driving distance, we’re there. Photographing what you’re passionate about will instinctively add a unique point of view to the images.
So, what are your passions? Antiques? Unique Hotels? Exquisite food? Sporting events? Fishing? Camping? Hiking? Whatever they are, start focusing on them (if you don’t already).
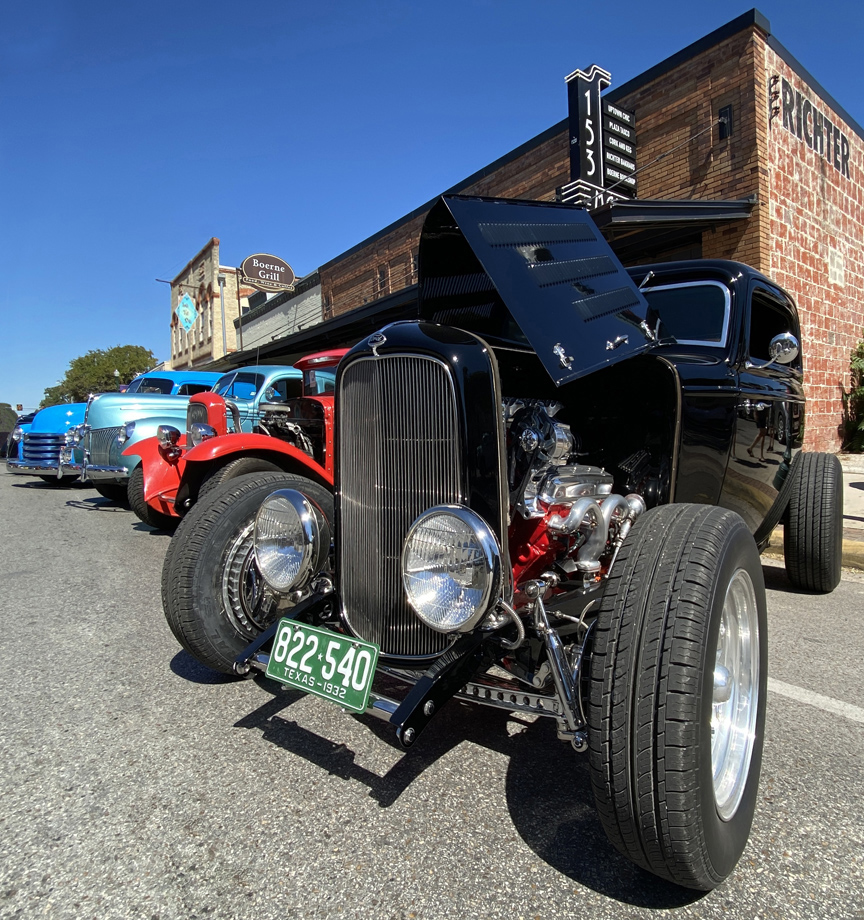
1932 Ford Deuce Coupe. Photographed at the 2021 Key to the Hills Rod Run car show. Captured on an iPhone 11 Pro Max with Beastgrip and Bluetooth shutter release in natural light. Camera positioned at headlight level.

Even when you’re shooting formal portraits, the iPhone lets you work lighter and faster on location. For food, I’m able to capture images, fresh out of the kitchen, as I’m being served. It’s the most intuitive process for photographing food I’ve found.

The portrait for Road Portraits (above left) was captured on location at the Wildflour Bakery. Photographed on a tripod with natural light in open shade. Using a tripod let me take my eyes off the screen and look directly at people to capture different expressions.
The Oreo Cheescake (above right) was captured in Portrait Mode using natural room light plus window light from behind the subject and a small amount of supplemental light from handheld Lume Cube positioned behind and to the right.
Portrait Mode is one of my favorite techniques for photographing food. The blurred background focuses attention on the food. Photographed on location in Portrait Mode using natural light.
Post production included onboard color cleanup and offloading to clean up the background and skin tones in the cover image and reorient parts of the food image to appear squared to edges.
Captured on an iPhone 11 Pro Max with Beastgrip and Bluetooth shutter release in natural light.

Road trips, more than any other factor, were one of the biggest motivators to start using my iPhone more and more often. iPhones on the road remove every obstacle that any other camera impose as you drive down the road.
Driver point of view images and scenics captured from a moving vehicle? No problem. Pull over, shoot and get back on the road in just a few minutes? Easy. Everything about road trip images is easier with an iPhone.
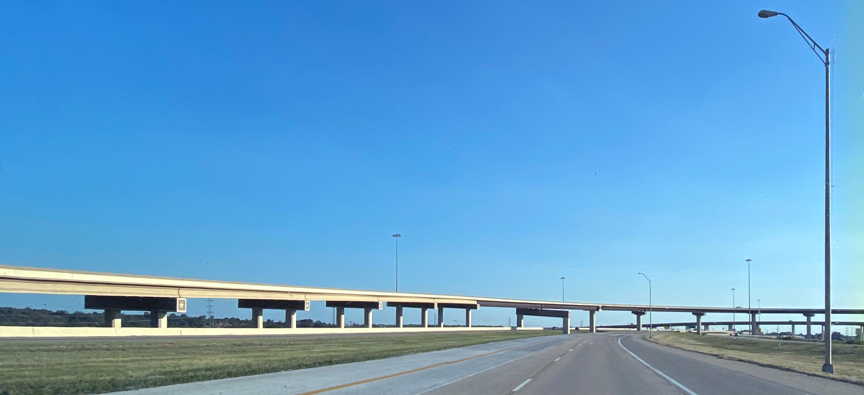
The view through the windshield at 60mph driving the onramp to the Texas Toll Road. Captured on an iPhone 11 Pro Max with Beastgrip and Bluetooth shutter release in natural light.
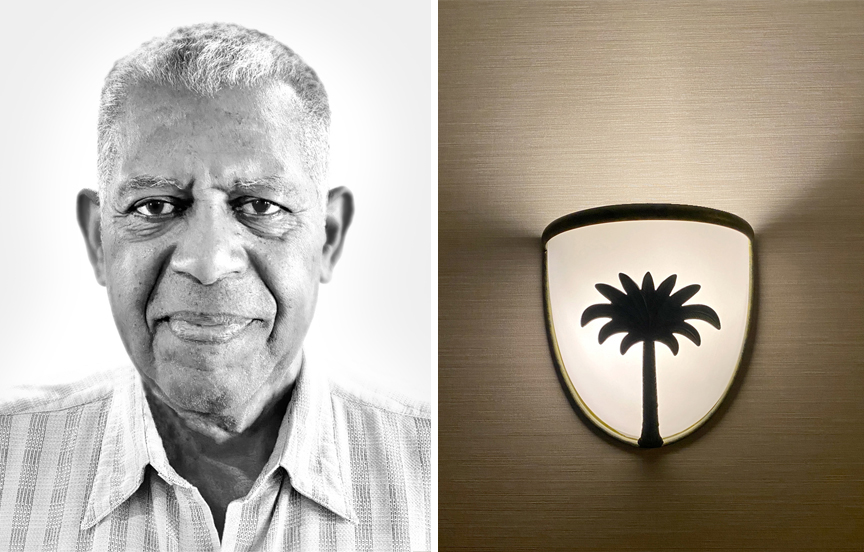
This portrait of fellow traveler Walt (above left) and the wall sconce detail (above right), were captured in the lobby of The Lighthouse Inn, Rockport, Texas. In less than 10 minutes, I had asked to take the portrait, posed and captured the image. The graphic light fixture was taken on the way to dinner the night before.
Post Production included onboard brightness and contract adjustments and offloading for background and skin adjustment, density and perspective adjustment.
Captured on an iPhone 11 Pro Max with Beastgrip and Bluetooth shutter release in natural light.

Wall art is often an integral part of the interior environment of restaurants, bars, shops and destinations. It becomes part of the experience of being there. Photographing wall art adds that perspective to a visual story.

Burnt Bean BBQ. The steampunk light fixture and wall painting were captured after an hour wait in line during a cold morning for some of the best BBQ around. Burnt Bean has a unique, chef driven menu. That uniqueness is reflected in their restaurant’s interior and highlighted with procured wall fixtures and art.
Captured on an iPhone 11 Pro Max with Beastgrip and Bluetooth shutter release in natural light.
I love photographing doorways and bridges. They create transitional images that become metaphors for change. They symbolize connecting one space with another, bringing two sides together.
Doorways represent a change in life, moving from dark to light, outside to inside.
The geometric shapes of bridges are graphically interesting. Functionally they take you from one place to another. Symbolically they represent transition. And the act of creating a means to overcome obstacles.
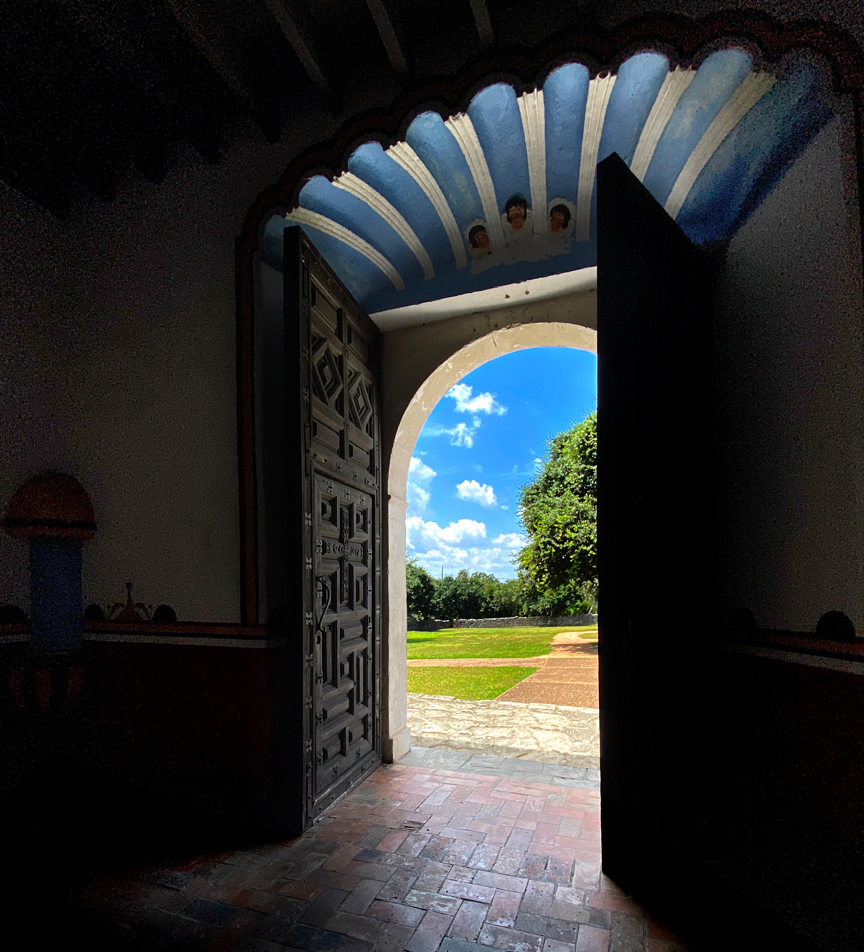
Church Doors. On the way home from our Back to the Beach road trip, we stopped in Goliad, Texas to photograph Mission Espiritu Santo. As soon as I saw the front doors I started looking for where I wanted to put the camera.
I found a camera position near eye level that captured the light spilling into the room from outside. I exposed for the outside light by tapping on screen to lock exposure and focus. Captured on an iPhone 11 Pro Max with Beastgrip and Bluetooth shutter release rig.
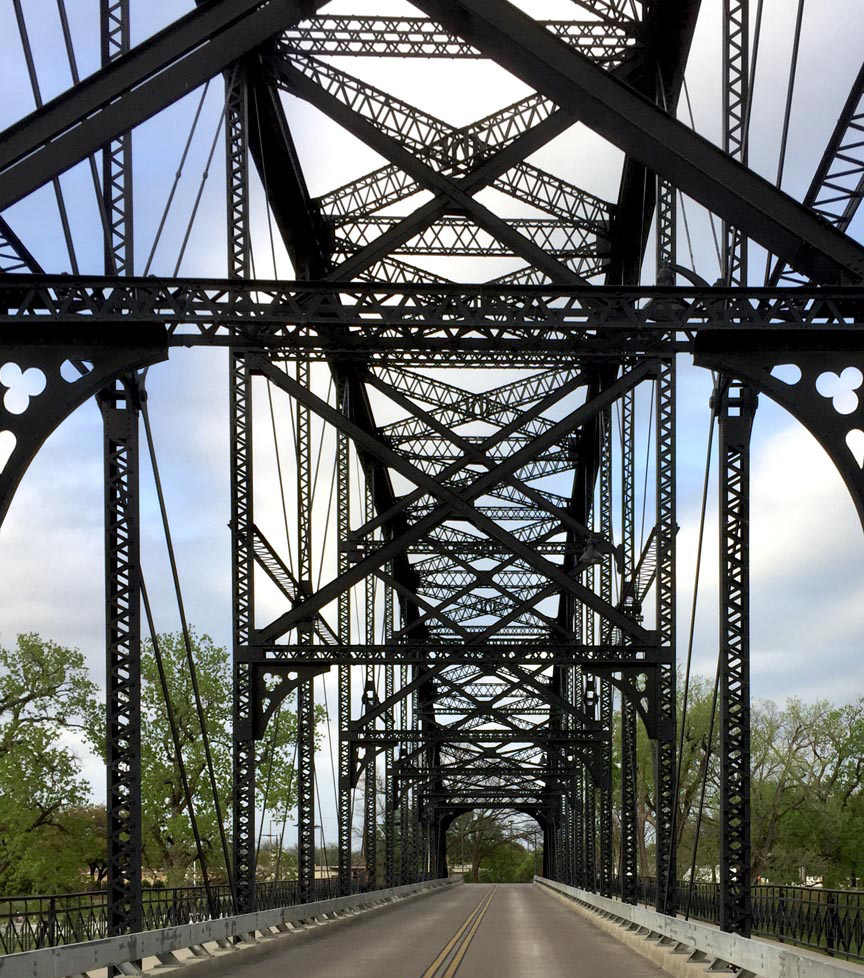
The Washington Street Bridge. I’ve photographed the Washington Street Bridge three times. First in 2019 capturing the graphic image above shooting handheld, midmorning on an iPhone 6. It was an overnight visit so I only had this one opportunity to shoot.
Built in 1901, the Washington Street bridge is one of eight vehicular bridges that crisscross the Brazos River connecting Northeast Waco to the historic shopping/dining district, the Waco Riverwalk, the Dr. Pepper Museum and the Magnolia Market at the Silos.
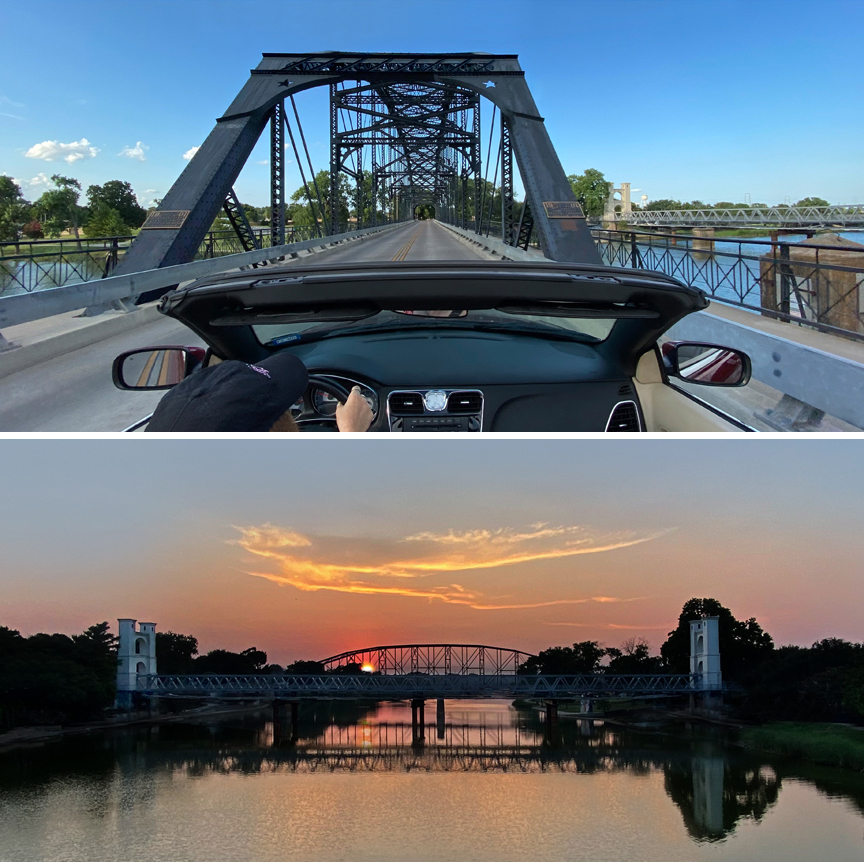
Two years later, in 2021, I photographed Washington Street Bridge again. It was a three day trip so there was time to scout the location first and plan the shoot.
The image above/top was captured midmorning the next day. We drove across the bridge three times to final get this image.
The image above/bottom was captured the next day at sunset. Shooting from the next bridge over, I was able to capture a sequence of the sun going down producing this image with the sun in the golden hour right at the horizon.
Both images were captured handheld on an iPhone 11 Pro Max with a Beastgrip and Bluetooth shutter release setup.
Post production included onboard, iPhone edits adjusting brightness and contrast and offloading for masking, clean up, perspective, color and brightness corrections in Photoshop Elements.

Today, films are using more and more low light imagery to tell a story. Films like The Batman and Zero Dark Thirty. Why? Because low light and night photography produce dramatic images that, to me, make you feel like you’re actually there, that let you jump the gap from viewer to participant.
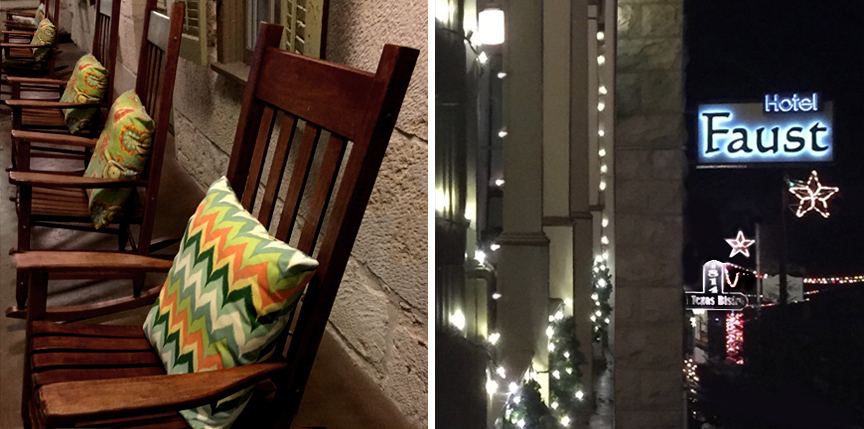
It’s too easy to stop shooting after the sun goes down. The “light” is gone so there’s nothing to shoot, right? Wrong. That’s why I consciously remind myself to go out and shoot at night, even if it’s for just 10 or 15 minutes.
10 or 15 minutes. That’s about how long it took to capture these images of The Faust Hotel at Christmas time. Images that say “Christmas”. Captured hand held on an iPhone 6.
NIGHT PHOTOGRAPHY TIP: Turn your flash off and let the camera calculate the exposure.
Post production included onboard exposure and color adjustments and offloading for final perspective correction and exposure and composition clean up.
NOTE: Starting with the iPhone 11 Pro Max, Night Mode was added. Night Mode uses a variation of HDR image capture technology capturing multiple frames and using parts of each to produce even more extraordinary low light images.

Post production is where you can take control of every aspect of your images.
In Post includes how to guides for onboard corrections and offloaded post production processes. You’ll also find skill building references that include Working With Files, File Naming, Onboard Adjustments, Offboard Workflow, Retaining Detail when Resizing Images, Onboard Apps, Offboard Editing and Skill Building Resources.
- General Practices
- Assemblages & Abstractions
- Change the Composition of an Image
- Color Correction vs Color Grading
- Color Correction & Color Grading Samples
- Create Motion with Live Photo
- Resize Images and Retain Detail
- Software and Skill Building Resources
- On Board Apps
- Offboard Software
- Post Production Apps
- Online Resources

WORKING WITH FILES: I never work on the original image. For onboard, in-camera corrections, I make a Live Photo duplicate first and work on the duplicate. Offloading an image by default creates a duplicate in the offloaded image. Both methods preserve the original image for later use/reference. No mater what I do to the duplicate, I can always “fall back” to the original and start over.
FILE NAMING: When working on a JPEG (JPG) or a Photoshop Document (PSD), I create a new saved file giving it a short, descriptive name. I include the letters WIP in the name to identify it as work in progress. I also keep the original image number as part of the file name in case I need to go back to the original later.
So “IMG 0811” becomes “Gulls in Flight WIP IMG 0811.PSD” or “Gulls in Flight WIP IMG 0811.JPG”.
After the image has been resized for final use, the name is changed to “Gulls in Flight Final IMG 0811 864P”. The 864P is a quick reference to the finished image width.
ONBOARD ADJUSTMENTS: Before I offload images for post production, I look for images that could benefit from onboard adjustments first. How do you know which ones to adjust onboard? Early on, I found that there was some trial and error behind this decision. If I didn’t like what I had to work with offboard, I went back to my iPhone, made changes and tried those.
GOING OFFBOARD: Image that need complex post production are offloaded to a laptop file.
Images I Offload Generally go Through this Workflow:
- Color and density correction
- Perspective correction
- Select areas for special adjustment
- Color grade the image
- Save the image as a PSD for future changes
- Flatten the image and save as a JPEG image
- Resize the image for end use
- Save resized image with unique title
I work with and save full size files until the image is finalized.
Then I resize it for final use. 1080 pixels wide for all social media and 864 pixels wide for blog posts. Why 864 pixels? After a lot of sizing tests, 864 pixels gave me a small file size for SEO and maintained image quality.

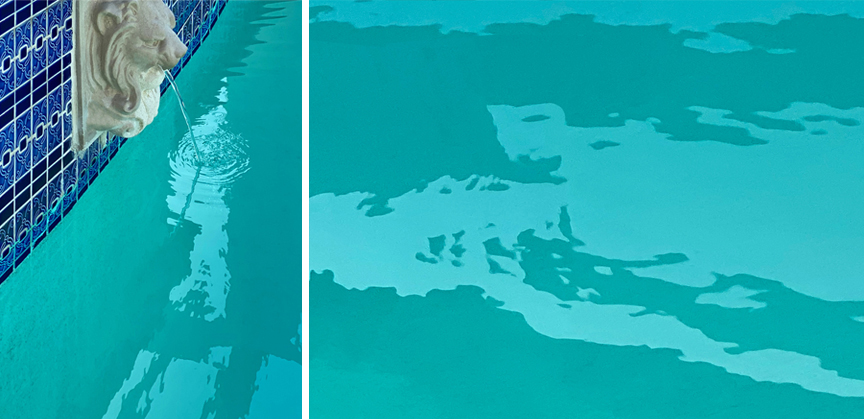
Pool Detail and Abstract Assemblage. When I shot the pool side detail image, I could see the potential for an image within the reflection. Captured on an iPhone 11 Pro Max with Beastgrip and Bluetooth release using natural light. Post production started with isolating the reflection in the water, deconstructing it into sections, inverting, rotating, distorting and assembling the elements into an abstract. Look at the lower half of the overall detail to find the area used
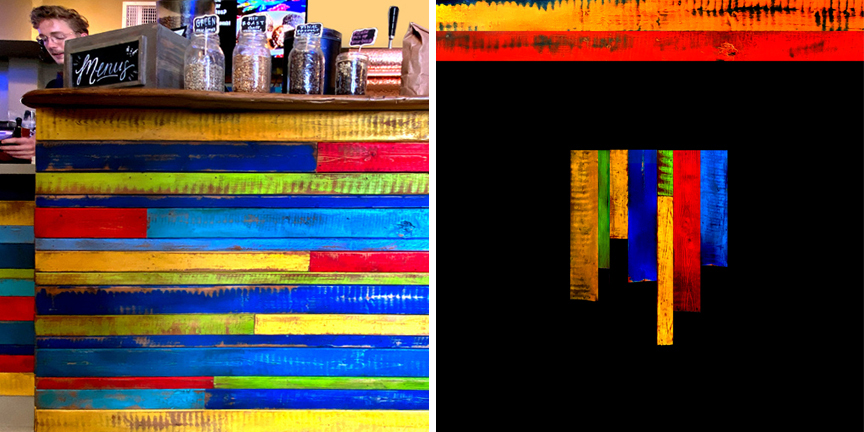
Reclaimed Wood Assemblage. The image of reclaimed wood on the front counter at Island Joe’s Coffee and Gallery, Padre Island, became the elements used in the Island Joe’s abstract assemblage. Captured on an iPhone 11 Pro Max with Beastgrip and Bluetooth release using natural light. Individual planks were selected, masked, sized, reassembled and adjusted for color and density.

The main reasons to change an image’s composition are to improve a subject’s placement and to direct the viewer’s focus in the frame.
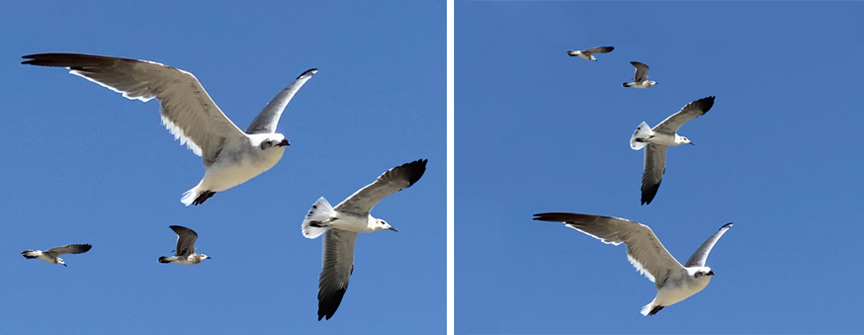
Before & After: Gulls in Flight original (left) was captured shooting hand held on an iPhone 11 Pro Max with Beastgrip and Bluetooth shutter release.
The original positioning of the gulls didn’t feel like it directed visual attention to any one subject. The angles and scale of the birds lent itself to using an arc composition to create a sense of the birds catching the wind and going up and off to the left and, at the same time, lead the viewer’s eye from the top of the frame down to the predominant bird at the bottom.
Gulls in Flight Post Production
- Offload the image and open in Photoshop Elements
- Duplicate the background layer of the original image in a second layer
- Individually select each bird, copy it and paste into a separate layer
- Duplicate the background again creating another layer under the bird layers
- Use the airbrush mode of the brush function to paint over each bird by sampling the sky colors to seamlessly delete the original birds and create a blue sky background
- Finally, rearrange each bird one by one to create an arc composition
- Save the file as a Photoshop Document (PSD) with WIP (work in progress) in the name to easily identify for future changes
- Flattened the image then select and copy the flattened image
- Use the undo command in the history to undo the flatten command and retain all the layers
- Under File and New, choose Image from Clipboard and a new image of the flattened original was created
- Flatten the new image and save as a JPEG (JPG) file

Color correction is tasked with cleaning up and correcting any color shift and adjusting saturation to achieve a natural look in your image.
Color grading then goes on to define your visual style.
Borrowed from filmmaking, color grading is tasked with achieving the visual look you want for an image or group of images. Do you want vivid colors? Muted colors? Monochrome? Low contrast? High Contrast?

The samples below start with the original JPEG file offloaded from the iPhone library.
The original, unadjusted image (below left) was captured with the iPhone 14 Pro Max, shooting the still life on a dining room table, handheld using a Beastgrip and Bluetooth remote trigger (my everyday setup), under natural overhead tungsten lights.
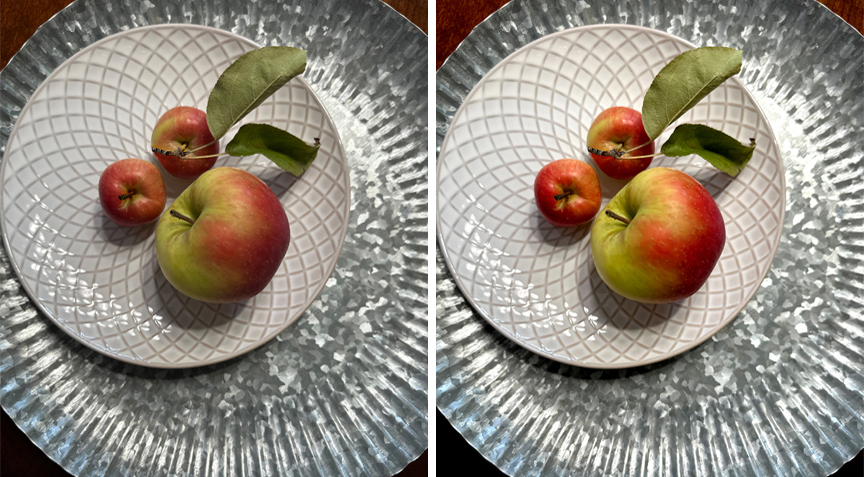
Color Correction. The original image (left) is shown straight out of the iPhone. It’s a great example of how good a job the iPhone does capturing an image using just the scene’s natural light. The color corrected image (right) shows the subtle brightening up overall plus the small color saturation correction to give the platter and apples more visual “pop”.
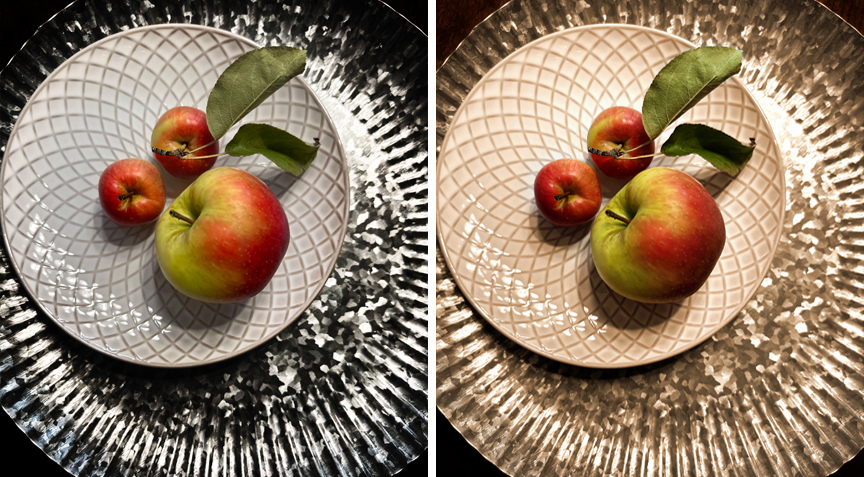
Color Graded Images. Here are two color grading examples. Both retain the main subject’s vivid color and brightness then grade the backgrounds adding a low key color grade to the image (left) and a slightly muted sepia shift (right).
Post Production Tip: Always adjust/correct density (levels) before correcting color.

I capture all of my images with the iPhone Live Photo mode. Why? Because Live Photo gives me more options in post production.
Live Photo mode captures a high resolution key image and a lower resolution 3 second video clip starting 1.5 seconds before and running 1.5 seconds after the key photo is captured.
Later, you can choose to use that key image or add an option. Loop plays the video over and over. Bounce plays the video forward and backward. And Long Exposure uses AI to merge the images together and form a blur emulating a conventional long exposure.
The Long Exposure option is one of my favorite ways to add a sense of motion. Here’s how.
Start by making two duplicates of the original Live Photo image (making two copies preserves the original).
Choose the Long Exposure option in one of the images and leave the other image as is.
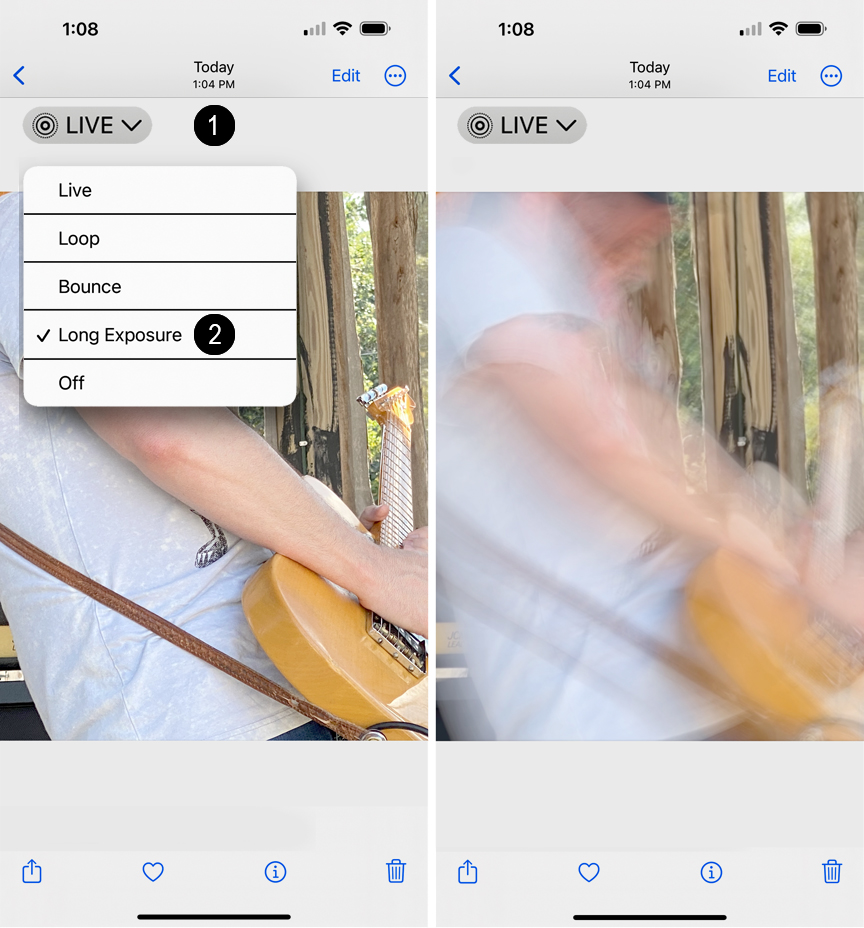
To add a motion blur: 1) Tap on Live Photo, 2) Tap on Long Exposure. Image will process and produce the results on the right.
Next, offload the original image and the blurred image to Photoshop Elements.
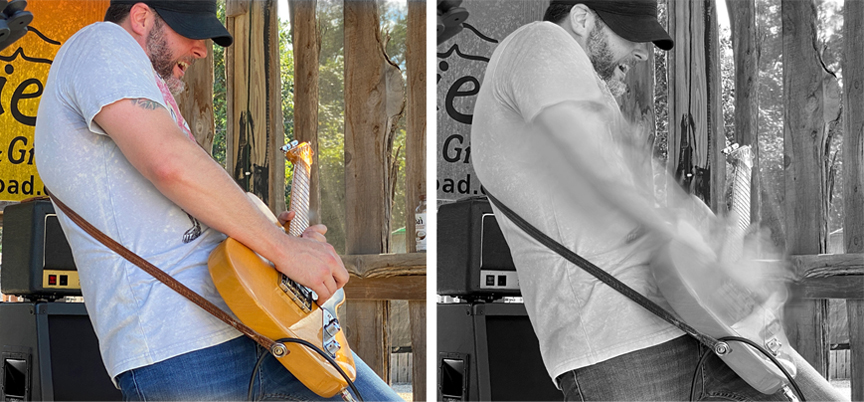
Before & After. To create a sense of motion in this image of guitarist Brance Arnold, post production started by combining just the arm and hand section of the iPhone Live image Long Exposure to the original then converting it to monochrome.
I made some brightness and contrast adjustments, cleaned up the final image, deleted some background objects (the bottle on the right edge for example) and saved the first as a Photoshop Document then as a full size JPEG file.

Stair Interpolation. The idea behind Stair Interpolation is simple. Imagine two pixels in an original image. To increase the image size by, say, 200% in one step, you add the space of two pixels between the original pixels, then rely on software to “guess” what should be in that space.
With Stair Interpolation, you increase the image size in small, 10% increments. By using bilinear or bicubic interpolation to increase the image size 110% over and over, you increase the space between pixels by only 10% each step – 1:10th of a pixel. At 10%, the software is able to do an excellent job of filing in the space.

Here is a deep dive into the software I use and why, other software that might fit your workflow and resources to develop you post production skill set.

Photoshop Express. A basic version of Photoshop, the Photoshop Express app runs on iPhone. It’s the first additional edit app I installed and it’s next in line after the on board edit features for some, but not all images.
I use it to composite two, three or four images together and resize on the fly for Instagram or blog posts and have also started using it for masking and adjusting main subjects, basic skin smoothing, facial feature adjustments, some healing functions and background manipulation.
Photoshop Lightroom. The Lightroom app for iPhone includes a camera function that gives you direct control of the iPhone Cameras and let’s you choose which lens to shoot with. It also gives you the option to shoot full auto or go to manual and set exposure, color balance and effects, (a feature I’ve would have liked to have more than a few times). Plus post production options including basic image correction functions.
Slow Shutter Cam. The Slow Shutter app gives you freeze control and lets you capture motion blurs and light trails, effects you might have thought you could only get with a DSLR.

Photoshop Elements is my go-to software for images that require complex changes and adjustments.
And for creating graphics, infographics, logo types and type graphics, from scratch, for original design objects used in everything from blog graphics to social media posts.
Why Photoshop Elements
Photoshop has evolved into the monthly/annual subscription powerhouse, Photoshop CC. Still, I run Photoshop Elements Here’s why.
When I started using Photoshop, it was pretty much limited to creating adjustment and edit layers using manually selected image sections for adjustment. There were auto-select options available but they usually created jagged, pixelated outlines that couldn’t be seamlessly blended.
So I learned how to use the Photoshop core functions. To manually make precise, complex selections and to adjust and seamlessly blend those selections into an image.
Over the years Photoshop has added more and more features but I keep finding myself relying on those same core functions I’ve used since digital cameras were introduced.
Photoshop Elements has a one-time, $99.99 purchase price
Photoshop Elements. Photoshop Elements has all the functions I’ve used for years plus a set of automated selection options and edits to change, smooth and adjust faces, heal blemishes and change backgrounds.
For video post production, add Photoshop Premier for a one-time purchase price of $50.00.
Adobe’s Photoshop is priced at $19.99 per month ($239.88 annually)
There are pro shooters that rely on Photoshop CC and/or Lightroom CC everyday but, for me, the expense didn’t make sense (Lightroom is $9.99 per month, $119.88 annually).
Plus, if you’re looking at setting up Lightroom or Photoshop but don’t have any experience with Photoshop, Photoshop Elements is an affordable introduction to Photoshop.

This is an interesting time for post production. Artificial Intelligence (AI) engines are being used by developers to create intuitive applications to perform portrait edit, sharpness, background change and video enhancement functions.
I don’t do enough of the edit functions these apps would automate to justify the cost of integrating them into my workflow (for now, I’m performing these functions manually) but they might fit your workflow.
Topaz Labs
Topaz Labs has a neat trio of apps. DeNoise AI ($79.99) eliminates severe noise and recovers image detail. Gigapixel AI ($99.99) lets you upscale image size up to 600% while preserving detail (read about Stair Interpolation, a manual alternate to Gigapixel, in my post production post notes . Sharpen AI ($79.99) allows you to recover missed focus, lens softness and motion blur for tack sharp images. You can by all three apps for $199.99.
Portrait Pro
If you do a lot of portraits, Portrait Pro ($59.95 to $89.95) offers both freestanding and Photoshop plug in apps to smooth skin and lighting correction. Add body change ($39.95) to perfect body shape. I’m able to do everything this software does manually but if I had 100s of portraits to do this would be my go-to software.
Everyday seems to bring more “automatic” AI software to fix some aspect of an image
Should you buy these? I take a cost/benefit approach, looking at the benefit an app claims then think back over the images I’ve worked on in post for the last six months to see if the number of times I could have used the app justifies the expense.
I also look at what the app does (some completely change backgrounds and lighting and add overlays) changing images to the point that they don’t resemble what I shot at all. To me, some of the AI software available creates cookie cutter images that look too manipulated and/or too much alike.

For Photoshop Elements tutorials, I search the function I’m working on with “How To Gurus” in the search term. For example How You Can Use Photoshop Elements to Change A Background How To Gurus brings up a great how to guide for selecting a subject and changing the image background. There is no charge to view an individual You Tube How To Guru tutorial. How To Gurus also offers online software training. Their complete Photoshop Elements course is under $40.

- Shot on iPhone Toolbox [ Homepage ]
- Two Essential Skills [ Change How You Shoot ]
- Two iPhone Features People Take for Granted
- Toolbox How To Guides [ 27 Deep Dive Guides ]
- Translate your Skill Set into a Working Process
- IDEA FILE Shot on iPhone Gallery One
- IDEA FILE Road Portraits One
- IDEA FILE Road Portraits Two
- Digital Evolution
- From The Batman to Shooting on iPhone
- Making the Case For Shooting on iPhone
- Camera and Light Kit Ideas
- Copied on iPhone
- The Power of One Idea
- Becoming Proficient in Post Production
- Designing with Type
- Learning From Cinema
- How the Three Lenses on iPhone Work
- Here are My Influences [ Who are Yours? ]
- Steve Holloway [ Photographs ] Pre iPhone
- Steve Holloway [ Memoirs ]
