
SKILL SET
Learning Post Production

WRITTEN & PHOTOGRAPHED BY: STEVE HOLLOWAY
I take a hands-on approach to post production, choosing and/or installing an edit app or function, opening an image and working with it. I learn how to use the feature(s) or function then decide how well it works and where it fits in my workflow.
Becoming proficient.
The important thing is to start working with the app or function. Look at all the pull down menus, learn what they do. Find guides and videos to learn and get the most out of the app or function. Do what works for you.
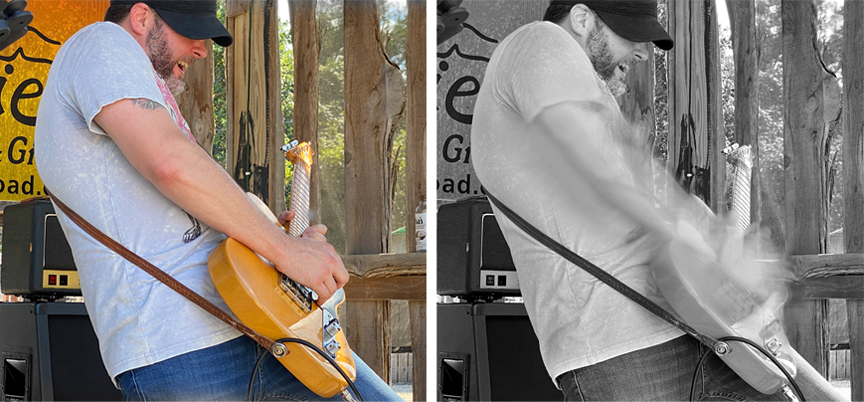
BEFORE & AFTER. To create a sense of motion in this image of guitarist Brance Arnold, post production started by combining a section of an iPhone Live image Long Exposure to the original then converting it to monochrome.
I learned Post Production on 4 Megapixel, Artifact Laden, Olympus E 10 Images
I began shooting digital images on the Olympus E 10, the first digital single lens reflex camera designed for commercial work. The 4 megapixel image sensor in the E 10 produced images full of digital noise and debris. Every arc, radius and rounded corner was made of noticeable stair step fractals that required a combination of blending and blurring to make them visually “disappear”.
Learning Post Production Meant Learning Photoshop
Since an entire industry became early/immediate adopters of digital images, photographers had to learn Photoshop FAST.
There weren’t many learning resources to turn to so learning Photoshop came down to installing the program, finding shortcut guides, loading an image and trying function after function.
Learning Photoshop on those early images evolved into an indispensable post production skill set for creating clean, detailed images. A skill set that allowed me to deliver reproduction ready images giving me a unique market advantage. A skill set I still use almost every day.
Using Post Production Skills to Create Graphics, Infographics, Logo Types and Type Designs
I design and create all of the graphics, infographics, logo types and type graphics you see in Drop Top Road Trips and Shot on iPhone Toolbox, from scratch, with Photoshop Elements.
It’s my go to resource for text and graphic design objects. From the Toolbox logo type to Toolbox’s opening headings to social media posts.
This post looks at what I shoot, the editing software I use and the workflow I’ve developed
It looks at how I’ve used basic, affordable tools to create complex images and graphics. At how skills and abilities are your most important “accessory”.
It may not be exactly what you need but it’s a workable starting point.
What you shoot, what you want your work to communicate will dictate your software and workflow.
Photojournalism vs Photo-Illustrations
I shoot landscapes, cars, live action (musicians, chefs, artists), wall art, found objects, food, details for assemblages and abstractions, architectural, portraits, still lifes and copy work.
My images are created mostly for the travel blog, Drop Top Road Trips.
They are not photojournalism. As I understand the definition, photojournalism uses unretouched images without modification.
I’m meticulous when it comes to getting the most out of a photograph
I approach images as photo-illustrations, taking them from ho-hum to stunning.

BEFORE & AFTER. Post production for the Austin Motel sign included taking out shadows and a street light and brightening up the main areas.
Sometimes the smallest changes make the biggest difference
I make subtle changes that make the images better and that, if you didn’t see them side by side, you probably wouldn’t realize they had been changed.
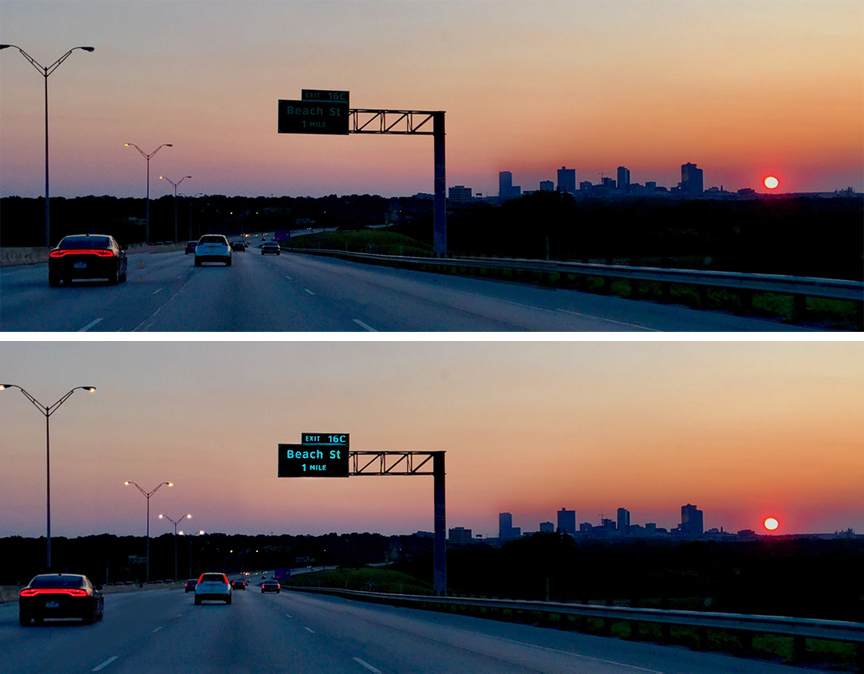
BEFORE & AFTER. For my Twitter header photo, post production included turning on the street lights and tail lights, moving the Dodge Charger on the left over to make room for the logo then brightening up the highway sign.
Turning on street lights and tail lights, taking out objects and shadows and brightening up signs might seem minor but, to me, something would be missing without these changes. You would look for them to be there and, when they weren’t, it would discount the effect of the image.
Can you do too much?
Absolutely. The tendency to keep doing a little more and a little more can produce an unnatural feel to an image. Learning when to stop making changes is an important skill.
My images have gone through Photoshop, usually more than once, to remove or modify unattractive or distracting features and elements. Still, I never distort the truth of the subject, I only work to improve an image or to stylize it using color grading.
Those are the guidelines I use. Yours can be completely different depending on what you want your images to look like.
Here’s my Post Production Workflow
My typical workflow almost always starts with the iPhone Onboard Edit Functions. Some images move to the iPhone App, Photoshop Express.
For complex, final post processing, images are offloaded to Photoshop Elements.
Start with iPhone’s Onboard Editing
One thing that surprised me when I started shooting on iPhone, is how much Apple’s onboard edit features allowed me to do. Correct perspective. Rotate and crop images. Clean up color and density. Convert images to black and white. It’s not a pixel by pixel adjustment but works great for a lot of edits. This should be your front line choice for initial edits.
Depending on what you’re trying to do, iPhone’s onboard edit features may work for most or all of the edits you need.
Next Look to Onboard Apps
Photoshop Express. A basic version of Photoshop, the Photoshop Express app runs on iPhone. It’s the first additional edit app I installed and it’s next in line after the on board edit features for some, but not all images.
I use it to composite two, three or four images together and resize on the fly for Instagram or blog posts and have also started using it for masking and adjusting main subjects, basic skin smoothing, facial feature adjustments, some healing functions and background manipulation.
Photoshop Lightroom. The Lightroom app for iPhone includes a camera function that gives you direct control of the iPhone Cameras and let’s you choose which lens to shoot with. It also gives you the option to shoot full auto or go to manual and set exposure, color balance and effects, (a feature I’ve would have liked to have more than a few times). Plus post production options including basic image correction functions.
Slow Shutter Cam. The Slow Shutter app gives you freeze control and lets you capture motion blurs and light trails, effects you might have thought you could only get with a DSLR.
Going Offboard
Before I offload images for post production, I look for images that could benefit from onboard adjustments first. How do you know which ones to adjust onboard? Early on, I found that there was some trial and error behind this decision. If I didn’t like what I had to work with offboard, I went back to my iPhone, made changes and tried those.
For a deep dive into my offboard process, go to My Offboard Workflow for step by step info, The Difference Between Color Correction and Color Grading for an introduction to color grading and Online Resources for more learning guides.
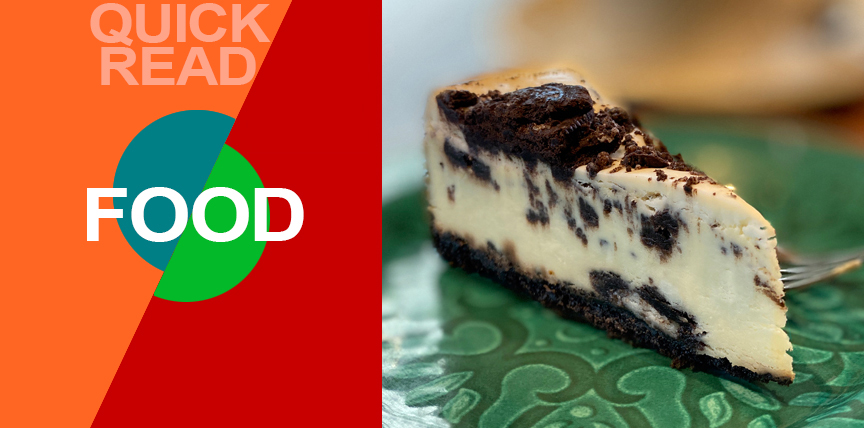

QUICK READ: FOOD
Food is One of my Favorite Subjects
When I shoot food with an iPhone, I’m able to capture images, fresh out of the kitchen, as I’m being served. It’s the most intuitive process for photographing food I’ve found.
The Oreo Cheescake (above right) was captured at The Wildflour Bakery & Grill in Portrait Mode. I almost always photograph food with light coming from behind the food. For the Oreo Cheesecake shot, I used natural room light plus window light from behind the subject and a small amount of supplemental light from handheld Lume Cube positioned behind and to the right.
Portrait Mode is one of my favorite techniques for photographing food. The blurred background focuses attention on the food. Photographed on location in Portrait Mode using natural light.
Post production included onboard color cleanup and offloading to clean up the background and reorient parts of the food image to appear squared to edges.
Captured on an iPhone 11 Pro Max with Beastgrip and Bluetooth shutter release in natural light.

- Shot on iPhone Toolbox [ Homepage ]
- Two Essential Skills [ Change How You Shoot ]
- Two iPhone Features People Take for Granted
- Toolbox How To Guides [ 27 Deep Dive Guides ]
- Translate your Skill Set into a Working Process
- IDEA FILE Shot on iPhone Gallery One
- IDEA FILE Road Portraits One
- IDEA FILE Road Portraits Two
- Digital Evolution
- From The Batman to Shooting on iPhone
- Making the Case For Shooting on iPhone
- Camera and Light Kit Ideas
- Copied on iPhone
- The Power of One Idea
- Becoming Proficient in Post Production
- Designing with Type
- Learning From Cinema
- How the Three Lenses on iPhone Work
- Here are My Influences [ Who are Yours? ]
- Steve Holloway [ Photographs ] Pre iPhone
- Steve Holloway [ Memoirs ]
